Introduction
Hi there, with this article I will demonstrate how to make a facial recognition API with Node.js, Express, MongoDB and face-api.js. These are the main packages however we will need some more packages too which I will show later in the article. I will code along to show you how it works and the main objective of this API is to persistently store the face data in a database so that even if the server is down, we have the data stored in the database. Therefore, we won’t have to train the model with all the images again. Before we start please make sure you have some understanding of the following topics
- Node.js
- Express.js
- MongoDB + Mongoose
- Async functions
The purpose of the API
Facial recognition is becoming an important feature these days. Recently I had to work on a project from my university which required authentication features based on facial recognition. When working on this project with Node.js and Express, I couldn’t find enough resources to integrate a server with a face recognition model and to store the data in a database. Moreover, some of the face recognition APIs are becoming obsolete. Luckily I found a package called face-api.js which was able to solve this issue but it didn’t have enough documentation to implement with a server and database. Hence I decided to write this article. I will add the link to face-api.js documentation, models and the whole code for this article's API below. -
How the API works
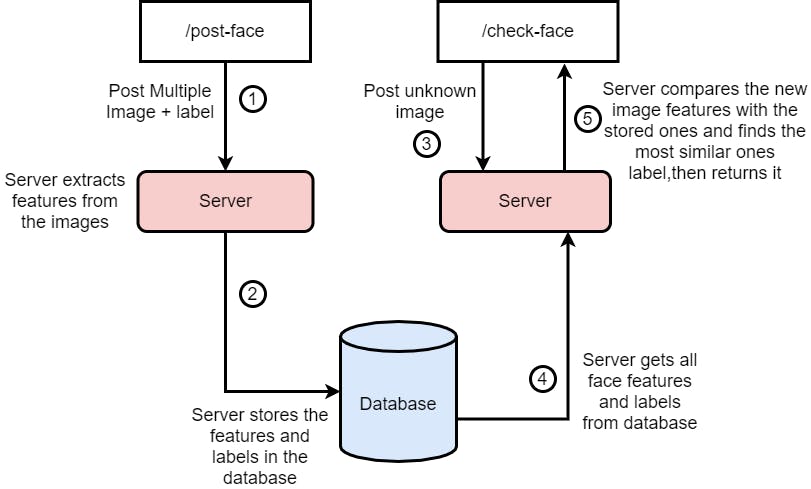
To keep this article short I will only show the main features needed to use facial recognition for general purpose applications. These features are -
- Getting multiple images of a face and label.
- Extracting the features from the images and storing them in the database with the labels.
- Checking faces when a new image is uploaded and responding with the most similar image.
Here is a simple architecture of how it works -
Let's get to the code
Starting the express server
First let's start with importing the packages that are required for our API. Here is a list of the dependencies that you need to install using the npm package manager -
express
mongoose
express-fileupload
face-api.js
canvas
After installing the packages we can import them in our main server file, in my case this is the app.js file. Then we initiate our express server, connect it to the database and listen to the desired port. We should also add the express-fileupload as middleware to our server.
const express = require("express");
const faceapi = require("face-api.js");
const mongoose = require("mongoose");
const { Canvas, Image } = require("canvas");
const canvas = require("canvas");
const fileUpload = require("express-fileupload");
faceapi.env.monkeyPatch({ Canvas, Image });

const app = express();

app.use(
  fileUpload({useTempFiles: true})
);


// add your mongo key instead of the ***
mongoose.connect(
    `***`,
    {
      useNewUrlParser: true,
      useUnifiedTopology: true,
      useCreateIndex: true,
    }
  ).then(() => {
    app.listen(process.env.PORT || 5000);
    console.log("DB connected and server us running.");
  }).catch((err) => {
    console.log(err);
  });
Initiating the models
Now that our server works, we need to load our model. As we are using the pre-trained models of the face-api.js package, we need to download their saved models and initiate our face-api with the models. To do this make sure you can download the models, I have attached the link above to download them, then you can store them in a folder in the root directory of the server. For me I will name this folder as model, the naming is up to you, then using the following code I will load the model. I added this just after adding the fileupload as middleware.
async function LoadModels() {
  // Load the models
  // __dirname gives the root directory of the server
  await faceapi.nets.faceRecognitionNet.loadFromDisk(__dirname + "/models");
  await faceapi.nets.faceLandmark68Net.loadFromDisk(__dirname + "/models");
  await faceapi.nets.ssdMobilenetv1.loadFromDisk(__dirname + "/models");
}
LoadModels();
Defining the MongoDB Schema
In order to store our data in MongoDB database we need to create a database first and also define a Schema in our code. I will not show here how to create the database, but the following code is how I defined the Schema for our face data. It is important to notice the data types of the Schema, we are storing the labels as string and the descriptions as Array(the array actually contains objects).
const faceSchema = new mongoose.Schema({
  label: {
    type: String,
    required: true,
    unique: true,
  },
  descriptions: {
    type: Array,
    required: true,
  },
});

const FaceModel = mongoose.model("Face", faceSchema);
/post-face route and saving the data in database
Now that we have loaded the model and have a schema defined we can start receiving labelled face images and store them in the MongoDB database.
To do this first we need to define a function that receives a set of images and a label, then extracts the descriptions of the face and stores it in the database. The following function does the extract thing that I just said -
async function uploadLabeledImages(images, label) {
  try {

    const descriptions = [];
    // Loop through the images
    for (let i = 0; i < images.length; i++) {
      const img = await canvas.loadImage(images[i]);
      // Read each face and save the face descriptions in the descriptions array
      const detections = await faceapi.detectSingleFace(img).withFaceLandmarks().withFaceDescriptor();
      descriptions.push(detections.descriptor);
    }

    // Create a new face document with the given label and save it in DB
    const createFace = new FaceModel({
      label: label,
      descriptions: descriptions,
    });
    await createFace.save();
    return true;
  } catch (error) {
    console.log(error);
    return (error);
  }
}
We take in the images and label as input into this function. Then we wrap the function with try-catch so that if there are any errors in the process the app doesn’t crash. After that we define an array to store all the descriptions before uploading to the database and we go through each of the images to read the image with canvas.loadImage() function. Then we pass in the image data to the face-api methods and detect the faces features. The description is then extracted from the features and pushed into the descriptions array. So after all the images features are extracted we save the data in the database as per the Schema and return true if the task is completed.
The main method is ready so now we can start the route.The following is the code for the route -
app.post("/post-face",async (req,res)=>{
    const File1 = req.files.File1.tempFilePath
    const File2 = req.files.File2.tempFilePath
    const File3 = req.files.File3.tempFilePath
    const label = req.body.label
    let result = await uploadLabeledImages([File1, File2, File3], label);
    if(result){

        res.json({message:"Face data stored successfully"})
    }else{
        res.json({message:"Something went wrong, please try again."})

    }
})
The route is pretty simple. We just receive the files and label, then pass it into the function we defined earlier. Then we send the user a response depending on if it got saved or not.
req.files works only if you are using the express-fileupload package I mentioned earlier. Otherwise you will need to upload the images using other methods. Also in this example I showed only uploading 3 images of the face, but more can be used for better accuracy.*
/face-check route and recognizing faces
async function getDescriptorsFromDB(image) {
  // Get all the face data from mongodb and loop through each of them to read the data
  let faces = await FaceModel.find();
  for (i = 0; i < faces.length; i++) {
    // Change the face data descriptors from Objects to Float32Array type
    for (j = 0; j < faces[i].descriptions.length; j++) {
      faces[i].descriptions[j] = new Float32Array(Object.values(faces[i].descriptions[j]));
    }
    // Turn the DB face docs to
    faces[i] = new faceapi.LabeledFaceDescriptors(faces[i].label, faces[i].descriptions);
  }

  // Load face matcher to find the matching face
  const faceMatcher = new faceapi.FaceMatcher(faces, 0.6);

  // Read the image using canvas or other method
  const img = await canvas.loadImage(image);
  let temp = faceapi.createCanvasFromMedia(img);
  // Process the image for the model
  const displaySize = { width: img.width, height: img.height };
  faceapi.matchDimensions(temp, displaySize);

  // Find matching faces
  const detections = await faceapi.detectAllFaces(img).withFaceLandmarks().withFaceDescriptors();
  const resizedDetections = faceapi.resizeResults(detections, displaySize);
  const results = resizedDetections.map((d) => faceMatcher.findBestMatch(d.descriptor));
  return results;
}
This part is very critical and we need to be very careful. First, we get all the face data from the database. But the data we get are just objects in arrays. In order for our model to read the descriptions for each image, it needs to be LabeledFaceDescriptors Objects. However, to do that we need to pass in the descriptions as Float32Array. Therefore, for each of the face data, we loop through each of the descriptions which are objects. We turn these Object types into Array and then into Float32Array. Then we initiate the facematcher and read the image that has been passed into the function to carry out recognition. We run the processing and detection functions based on the documentation of the face API and return the results.
Now we can define the route to check the faces. The following is the route-
app.post("/check-face", async (req, res) => {

  const File1 = req.files.File1.tempFilePath;
  let result = await getDescriptorsFromDB(File1);
  res.json({ result });

});
In the route we just pass in the image and wait for the getDescriptorsFromDB function to carry out face recognition and return the result.
Testing
Our API is ready to go, now let’s test it with Postman. Postman is a great tool for testing API for free. You can download it here.
First I uploaded 3 images of the same person with the label like this -
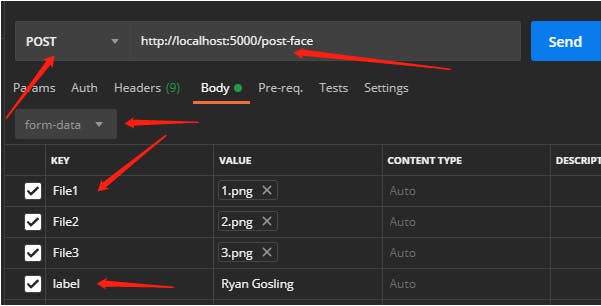
Please pay attention to the pointed details. If these don’t match with your code the server will respond with error. You should get a response like this if things went well -

In the database you should have documents like the following for each of the faces uploaded-
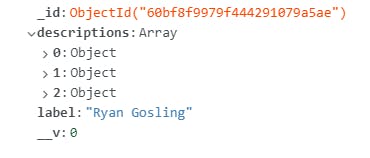
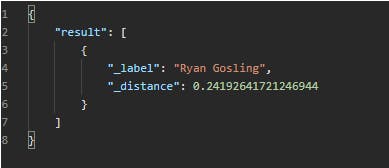
Now I can upload a test image and see if the API can recognize who’s face it is -
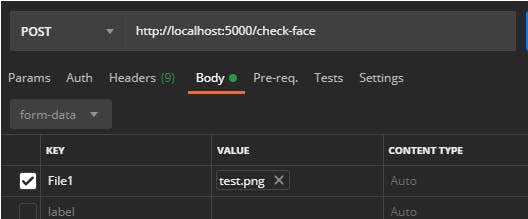
The outcome I get is this -
My apologies if the article was too long, but this was my first article. I hope you enjoyed the content. If this was helpful please drop a star on my github and share this blog with others. If you face any trouble with this code, you can reach out to me on twitter at @Zulkarn30860075.
Thank you so so much !!!!
